Get Crafty This Easter with an Origami Basket
Hop, hop, hop—when spring arrives, you can expect a cheerful holiday visitor to stop by soon. The Easter Bunny!
At the beginning of springtime, families around the world get ready to celebrate Easter. The holiday falls on the first Sunday occurring after the first full moon of the spring equinox in the Northern Hemisphere., This means the actual date of Easter changes from year to year (though it always takes place between March 22 and April 25.)
Easter celebrations differ from one culture to the next. On the island of Bermuda, families gather at Horseshoe Bay Beach to fly kites on Good Friday. In Finland, young girls dress up as “Easter witches” and go door-to-door around their neighborhoods, bestowing blessings with decorated willow branches and rhymes in exchange for chocolate treats. Australians celebrate the holiday by welcoming the Easter Bilby (a rabbit-eared marsupial native to the island) instead of the Easter Bunny. And in the United States, many families dye eggs in bright colors or hunt around their homes for plastic Easter eggs filled with goodies.
At Little Passports, we’re always looking for ways to cross borders and introduce kids to world cultures and traditions. We’ve combined the Japanese art of origami with the traditional Easter basket to bring you a fun Easter paper craft! Your kids can create a beautiful origami box for their Easter goodies—and all you need is a square of paper.
Origami: The History of Folded Paper
Origami is a Japanese art form that involves folding paper into two- or three-dimensional shapes. Traditional origami follows a specific set of rules: You must start with a single sheet of paper, you can’t cut the paper, and you can’t use glue or tape. Nowadays, many people use the term “origami” to refer to all types of paper folding.
The word “origami” comes from two Japanese words: ori, meaning “fold,” and kami, meaning “paper.” While historians aren’t sure exactly when origami originated, many agree the practice started in Japan about a thousand years ago. At that time, the practice was called orikata (which translates to “folded shapes”) and was mainly reserved for ceremonial and religious use. Over the years, as paper-making grew more widespread in Japan, origami became a recreational hobby.
The first origami instruction book, Tsutsumi-no-Ki, was published in 1764, followed by Hiden Senbazuru Orikata (“Secret to Folding One-Thousand Cranes”) in 1797., These books helped popularize origami thanks to their detailed diagrams. With pictures, readers could better understand how to recreate the folded shapes. People across Japan, other parts of Asia, and even regions of Europe further experimented with the art form over the centuries. Today, people around the world craft intricate paper figures regularly. Children can make an origami bouquet to give to a relative, create paper butterflies to decorate their room, build a gift box for a friend’s birthday present, and so much more.
How to Make an Origami Easter Box
People of all ages can enjoy origami—including your kids! The paper activity can help kids relax and focus, all while using their hands to create something truly special. So let’s explore how to make a DIY Easter basket. Kids of all ages can perform this craft, but younger children may need extra assistance. Grab some origami paper, gather the family, and start folding!
Step 1
Choose a piece of origami paper with a fun pattern on one side and that’s blank on the other. Place it on your work surface with the patterned side facing down. If you don’t have origami paper, you can use regular paper, but trim it into a 6-by-6-inch (15-by-15-centimeter) square.
Step 2
Fold the paper in half vertically and crease, then unfold it. Repeat the fold horizontally, crease, and unfold again. You should have two creases that evenly divide the paper into quarters, creating the shape of a plus sign (+).
Step 3
Fold one corner of the paper into the center. The corner should touch the middle of the “+” and the edges should line up with the creases from Step 2. Repeat with the other three corners until you’ve created a smaller square with the paper’s pattern facing you.
Step 4
Fold the right and left edges of the new square toward the center. They should meet in the middle but not overlap, creating one long rectangle. Unfold, rotate 90 degrees, and repeat this step.
Step 5
You should now have a long rectangle. Fold the short edges of the rectangle toward the center so they meet in the middle, then crease. You should now have an even smaller square.
Step 6
Unfold the paper completely and flip it so the patterned side faces down on your work surface. Now the paper has several creases to guide your folds in the next few steps.
Step 7
Turn the paper so its corners point up and downward, creating a diamond shape. The sheet should be divided into seven vertical creases—if the creases run horizontally, rotate the paper 90 degrees.
Step 8
Fold the left and right corners into the center of the paper. The points of the small triangles should meet in the middle.
Step 9
Your paper will now look like a square with a triangle poking out at the top and the bottom. Pull the top corners of the square toward each other until they meet along the centerline of the paper. This will cause the paper to stand up vertically and form the first side of your box. Crease the new folds to help the box stand up.
Step 10
Fold the top triangle down over the raised side from Step 8. Its point should reach the center of the box, where the tops of the two triangles with the patterned side meet up. Crease the new fold along the top of the box’s side to hold it in place.
Step 11
Turn the paper 180 degrees. Repeat steps 8–10 on the other end of the box, now at the top.
Step 12
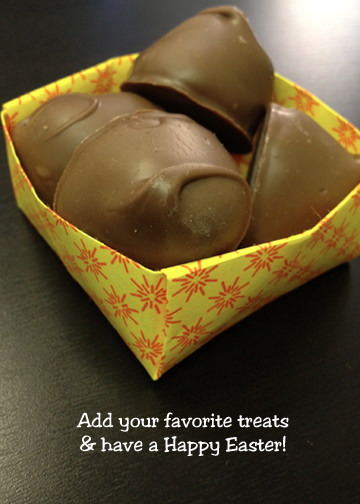
Smooth the edges and fill the paper box with your kids’ favorite chocolate eggs, jelly beans, or other Easter treats!

Keep Practicing Those Folds
Paper crafts are a fun and easy way to help children get creative and explore art—you’ll be amazed by the cool things they can make with just a few supplies!
This origami Easter basket is just one of many adorable DIY crafts you can do with your kids. Continue to practice origami with this Valentine’s Day paper heart, or try folding other types of paper (like these flowers made from coffee filters). Your kids will love making art—and memories—with you. And if origami sparks your children’s interest in faraway places, check out our World Edition subscription box. They’ll receive activities, stories, recipes, and more from a different country every month!


